How to Upgrade Your Computer Hardware: Boosting Performance and Extending Lifespan
How to Upgrade Your Computer Hardware: Boosting Performance and Extending Lifespan
In the ever-evolving world of technology, keeping your computer up to speed is essential for efficient work and play. While buying a new computer may seem like the go-to solution, upgrading your computer hardware can be a cost-effective way to boost performance and extend its lifespan. In this comprehensive guide, we’ll walk you through the process of upgrading various hardware components in your computer, from RAM and storage to graphics cards and cooling systems. By the end, you’ll have the knowledge and confidence to give your PC a significant performance boost.
The Power of CPU Upgrades
Central Processing Units (CPUs) are the heart of your computer, responsible for executing instructions and calculations. Upgrading your CPU can significantly impact your computer’s performance, especially for tasks that require intensive processing power.
Choosing the Right CPU
When selecting a new CPU, consider factors such as clock speed, core count, and socket compatibility with your motherboard. If you use your computer for gaming, content creation, or 3D rendering, opt for a CPU with higher clock speeds and more cores. On the other hand, if you primarily use your computer for everyday tasks, a mid-range CPU may suffice.
Before purchasing, check the compatibility of the CPU with your motherboard. Motherboards have specific sockets that support certain CPU generations, so it’s crucial to ensure a seamless fit.
Installing a New CPU
Upgrading your CPU requires careful installation. Here are the basic steps:
Preparation: Gather necessary tools, such as a screwdriver and thermal paste. Ensure you’re working in an ESD-safe environment to prevent static discharge.
Accessing the CPU Socket: Open your computer case and locate the CPU socket on the motherboard. Depending on your motherboard, you may need to remove the CPU cooler.
Removing the Old CPU: Lift the CPU retention arm, gently lift the old CPU out of the socket, and clean the CPU and cooler surfaces.
Applying Thermal Paste: Apply a small amount of thermal paste to the center of the new CPU.
Installing the New CPU: Align the CPU with the socket, ensuring that the alignment notches match. Gently lower the CPU into the socket, and secure it by lowering the retention arm.
Reassembling: If you removed the CPU cooler, reattach it, ensuring it makes proper contact with the CPU. Reassemble your computer and reconnect all cables.
Powering On: Power on your computer and ensure that the new CPU is recognized in the BIOS. You may need to update the BIOS for full compatibility.
Revitalizing Performance with RAM Upgrades
Random Access Memory (RAM) plays a vital role in your computer’s ability to handle multiple tasks simultaneously. Upgrading your RAM can lead to smoother multitasking and improved application responsiveness.
Understanding RAM Specs
When upgrading RAM, it’s essential to understand the specifications:
Capacity: RAM is available in various capacities, typically measured in gigabytes (GB). The more RAM you have, the more data your computer can hold in active memory.
Speed (MHz): RAM speed affects how quickly data can be read and written. Faster RAM can lead to snappier performance.
Type (DDR3, DDR4, etc.): Ensure that the new RAM is compatible with your motherboard’s memory slots.
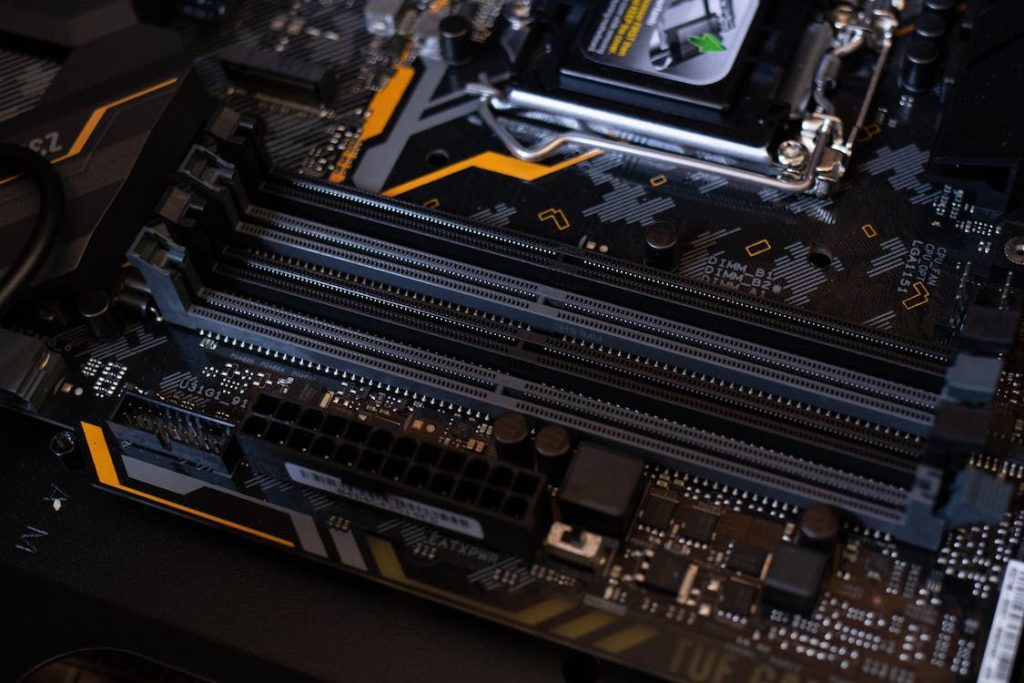
Installing New RAM Modules
Adding or replacing RAM modules is relatively straightforward:
Safety First: Power off your computer, unplug it, and open the case.
Locate the RAM Slots: Identify the RAM slots on your motherboard. Depending on your motherboard, you may have two or four slots.
Inserting RAM Modules: Press down on the tabs at the sides of the RAM slots to open them. Align the notches on the RAM module with those on the slot, and firmly press down until the tabs click into place.
Check for Recognition: Power on your computer and check the BIOS or operating system to ensure the new RAM is recognized and functioning correctly.
Supercharging Your System with Storage Upgrades
Storage upgrades can make a world of difference in your computer’s speed and responsiveness. Replacing a traditional hard disk drive (HDD) with a solid-state drive (SSD) is one of the most impactful upgrades you can undertake.
Why Choose an SSD?
SSDs offer several advantages over HDDs:
Speed: SSDs are significantly faster at reading and writing data, resulting in quicker boot times, faster application launches, and speedier file transfers.
Durability: SSDs have no moving parts, making them more shock-resistant and durable.
Energy Efficiency: SSDs consume less power, which can lead to longer laptop battery life.
Installing an SSD
Here’s how to replace an HDD with an SSD:
Data Backup: Back up your data to an external drive or cloud storage.
Shut Down and Disconnect: Power off your computer, unplug it, and open the case.
Identify the HDD: Locate the HDD you wish to replace.
Remove the HDD: Unscrew the HDD from its mount, disconnect any cables, and carefully remove it from the computer.
Install the SSD: Secure the SSD in the same location using the screws you removed from the HDD. Connect the appropriate cables.
Install the Operating System: Use a bootable USB drive or DVD to install the operating system (OS) onto the new SSD.
Restore Data: After installing the OS, transfer your backed-up data to the SSD.
BIOS Configuration: Enter the BIOS and ensure that the SSD is recognized as the boot drive.
Elevate Graphics Performance with a GPU Upgrade
If you’re a gamer or work with graphic-intensive applications, upgrading your Graphics Processing Unit (GPU) can unlock higher frame rates and smoother visuals.
Choosing the Right GPU
When selecting a new GPU, consider factors like gaming requirements, rendering capabilities, and power supply compatibility:
Gaming: Look for GPUs optimized for gaming, with features like ray tracing for realistic lighting and shading effects.
Workstation Use: Professionals in fields like 3D rendering and video editing may benefit from workstation GPUs designed for heavy workloads.
Power Supply: Ensure your power supply unit (PSU) can provide the required wattage for the new GPU. High-end GPUs often have higher power demands.
Installing a New GPU
Here’s how to upgrade your GPU:
Safety Precautions: Power off your computer, unplug it, and open the case. Disconnect any cables connected to the old GPU.
Remove the Old GPU: Unscrew the GPU from its slot and gently lift it out.
Install the New GPU: Align the new GPU with the slot, ensuring that it clicks into place. Secure it using the screws you removed from the old GPU.
Connect Power: If your GPU requires additional power connectors, attach them from the PSU.
Driver Installation: Power on your computer and install the latest GPU drivers from the manufacturer’s website.
Testing: Verify that the new GPU is recognized and functioning correctly. Test it with your favorite games or graphic-intensive applications to experience the performance boost.
Ensuring Optimal Performance with Cooling System Upgrades
A well-maintained cooling system is crucial for preventing overheating and maintaining your computer’s longevity. Upgrading your cooling system can ensure efficient heat dissipation and a quieter computing experience.
Types of Cooling Systems
There are two primary types of cooling systems:
Air Cooling: This method uses fans to dissipate heat from components like the CPU and GPU. You can upgrade your CPU cooler with an aftermarket air cooler for improved performance and quieter operation.
Liquid Cooling: Liquid cooling systems, or AIO (All-in-One) coolers, use a combination of liquid coolant and fans to dissipate heat. These systems can be more effective than air cooling and often come with RGB lighting for aesthetics.
Installing a New Cooling System
Here’s how to upgrade your cooling system:
Preparation: Power off your computer, unplug it, and open the case.
Identify the Cooling Component: Determine which cooling component you wish to upgrade—usually, the CPU cooler or case fans.
Removing the Old Cooler or Fans: If upgrading the CPU cooler, unscrew the old cooler from the CPU socket and gently lift it off. If upgrading case fans, remove the old fans by detaching them from the mounts.
Install the New Cooler or Fans: For CPU coolers, follow the manufacturer’s instructions for installation. For case fans, attach the new fans to the mounts or designated fan slots.
Cable Management: Organize and secure cables to ensure they don’t interfere with the new cooling system.
Testing: Power on your computer and ensure that the new cooling system is functioning correctly. Monitor temperatures to confirm that heat dissipation is efficient.
Regular Maintenance and Software Updates
Even after hardware upgrades, regular maintenance and software updates are essential to keep your computer running smoothly:
Cleaning and Dust Removal
Clean your computer’s interior regularly to prevent dust buildup, which can obstruct airflow and cause overheating. Compressed air can help remove dust from fans and components.
Driver and Firmware Updates
Regularly update your hardware drivers and firmware to ensure compatibility and access to the latest features. Check your motherboard and GPU manufacturer’s websites for updates.
Security Software
Install and regularly update antivirus and anti-malware software to protect your upgraded system from security threats.
Operating System Updates
Keep your operating system up to date with the latest patches and updates. These updates often include performance improvements and security fixes.
Backup and Data Protection
Continue to back up your data regularly to safeguard against potential hardware failures or data loss due to unexpected issues.
Conclusion: Unlocking Your Computer’s Full Potential
Upgrading your computer’s hardware can be a transformative experience, enhancing its performance and extending its lifespan. Whether you choose to upgrade the CPU, RAM, storage, GPU, or cooling system, the right upgrades can breathe new life into your system.
Remember that proper preparation, installation, and maintenance are crucial for a successful hardware upgrade. By following the steps outlined in this guide and staying proactive with maintenance and updates, you can ensure that your upgraded computer continues to deliver exceptional performance for years to come.