Tips for Applying False Lashes

Tips for Applying False Lashes: Mastering the Art of Lash Application
False lashes are a fantastic way to enhance your eyes and achieve a glamorous, dramatic look. Whether you’re a beginner or an experienced lash enthusiast, applying false lashes can be a bit tricky. However, with the right technique and some helpful tips, you can master the art of lash application and achieve stunning results. In this article, we’ll provide you with step-by-step instructions and valuable tips to ensure a seamless and flawless application of false lashes.
1. Choose the Right False Lashes
Before you begin the application process, it’s important to select the right pair of false lashes for your desired look. Consider the length, volume, and style of the lashes. If you prefer a more natural look, opt for lashes that are shorter and have a thinner band. For a dramatic and bold look, choose longer lashes with more volume.
2. Trim and Customize the Lashes
False lashes are often longer than your natural lash line, so it’s crucial to trim them to fit your eyes perfectly. Measure the lashes against your lash line and trim from the outer corner if necessary. Be cautious not to trim too much at once, as you can always trim more if needed.
Additionally, consider customizing the lashes to match your eye shape. If the lashes are too straight, you can gently curl them using a lash curler. You can also bend the band slightly to make it more flexible and easier to apply.
3. Prepare Your Natural Lashes
Prepping your natural lashes is an essential step to ensure a seamless blend with the false lashes. Follow these steps:
Step 1: Curl Your Natural Lashes
Use an eyelash curler to curl your natural lashes. This will help create a better base for the false lashes and ensure a more cohesive look.
Step 2: Apply Mascara
Apply a coat of mascara to your natural lashes. This will add volume and help blend them with the false lashes. Allow the mascara to dry completely before proceeding with the application.
4. Apply Adhesive
Now it’s time to apply the adhesive to the false lashes. Follow these steps:
Step 1: Choose the Right Adhesive
Opt for a high-quality lash adhesive that is latex-free and specifically designed for false lashes. Clear adhesive is ideal for beginners as it becomes transparent when dry. If you’re confident in your application skills, you can use black adhesive for a more seamless look.
Step 2: Apply the Adhesive
Using a small brush or the applicator that comes with the adhesive, apply a thin layer of adhesive along the entire band of the false lashes. Be sure to apply a bit more adhesive to the corners, as they tend to lift more easily.
Step 3: Let the Adhesive Dry
Allow the adhesive to dry for about 30 seconds or until it becomes tacky. This step is crucial, as applying the lashes when the adhesive is too wet can lead to a messy application.
5. Apply the False Lashes
Now that the adhesive is tacky, it’s time to apply the false lashes. Follow these steps:
Step 1: Use Tweezers or Lash Applicator
Using tweezers or a lash applicator, carefully pick up the false lashes from the center of the band. Avoid grabbing them from the ends, as this can damage the lashes or cause them to lose their shape.
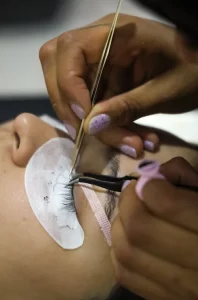
Step 2: Align and Place the Lashes
Starting from the center of your lash line, gently place the false lashes as close to your natural lashes as possible. Use the tweezers or applicator to press the lashes down along the entire lash line. Pay special attention to the inner and outer corners, ensuring they are securely attached.
Step 3: Adjust and Secure
If needed, make any necessary adjustments to ensure the lashes are properly aligned and sit comfortably on your lash line. Use the tweezers or applicator to press down on the lashes, securing them in place.
6. Blend and Mascara
To achieve a seamless blend between your natural and false lashes, follow these steps:
Step 1: Blend with Mascara
Once the adhesive has completely dried, apply another coat of mascara to your natural lashes. This will help blend them with the false lashes and create a cohesive look.
Step 2: Curl if Desired
If desired, you can use an eyelash curler to gently curl both your natural and false lashes together. Be cautious and ensure the lashes are completely dry before curling to avoid any damage.
7. Finishing Touches
Now that your false lashes are perfectly applied, there are a few finishing touches you can consider:
Step 1: Trim Any Excess
If you find that the false lashes are still slightly longer than you prefer, you can carefully trim them after the adhesive has dried completely. Trim from the outer corner, taking small increments at a time.
Step 2: Apply Eyeliner
If desired, you can apply a thin line of eyeliner along the lash line to further enhance the illusion of fuller lashes and create a more polished look.
Conclusion
Applying false lashes may seem intimidating at first, but with practice and these helpful tips, you’ll become an expert in no time. Remember to choose the right lashes, customize them to fit your eye shape, and prepare your natural lashes properly. Applying the adhesive correctly and placing the lashes accurately are key steps for a flawless application. Lastly, blend your natural and false lashes together and add any finishing touches to perfect your look. So go ahead, experiment with different styles of false lashes, and enjoy the dramatic transformation they bring to your eyes!